#hexadecimal to binary converter hexadecimal to binary converter online hexadecimal to binary conversion method convert hexadecimal to binary
Explore tagged Tumblr posts
Visit Tumblr Blog
Explore Tumblr blogs with no restrictions, modern design and the best experience.
Last Seen Tumblr Blogs


Fun Fact
China blocked Tumblr because of pornography and censorship problems in 2013.
Text
Understanding Hex Color Codes: How They Work and Why They Matter

In the world of digital design and web development, colors serve not only to enhance visual appeal but also to convey meaning, brand identity, and user experience. They play a pivotal role in shaping how information is perceived and interacted with online. Behind every vibrant website or engaging digital interface lies a sophisticated system of color representation: hex color codes.
These codes are indispensable tools that empower designers and developers to define precise color choices across diverse platforms and devices, ensuring consistency and fidelity to creative intent. This article explores the nuanced workings of hex color codes, shedding light on their intricacies, practical applications, and significance in modern digital media.
Hexadecimal Notation Explained
Hexadecimal, or "hex" for short, is a base-16 numbering system widely used in computing. Unlike our familiar decimal system (base-10), which uses ten digits (0-9), hexadecimal incorporates six additional symbols: A, B, C, D, E, and F, representing values 10 to 15. This system's utility stems from its direct correlation with binary, the fundamental language of computers. Each hexadecimal digit corresponds precisely to a grouping of four binary digits (bits), making it a convenient shorthand for representing binary values in a more manageable and human-readable format.
Components of Color: RGB Model
Colors displayed on digital screens are synthesized using the RGB (Red, Green, Blue) color model. This model operates on the principle of additive color mixing, where different intensities of red, green, and blue light combine to create a vast spectrum of colors. In RGB, each color component can independently vary from 0 (minimum intensity) to 255 (maximum intensity), allowing for precise control over the hue, saturation, and brightness of displayed colors.
Encoding Colors with Hex Color Codes
Hex color codes are a compact and efficient method of specifying colors in digital environments. Represented by a hash symbol (#) followed by six hexadecimal digits (e.g., #RRGGBB), these codes succinctly convey the intensity levels of red, green, and blue that compose a particular color. For instance, the hex code #FF0000 signifies pure red, with the red component at its maximum intensity (FF in hexadecimal) and no green or blue present (00 in hexadecimal).
Understanding Hexadecimal Conversion
Converting RGB values to hex color codes involves translating each decimal (base-10) value of the RGB components into its hexadecimal equivalent. This conversion simplifies the process of specifying colors in web design and graphic editing software, ensuring consistency across different platforms and devices. For example, the RGB value (255, 0, 0) converts directly to the hex code #FF0000, reflecting its pure red composition.
Efficiency and Range of Hex Codes
Hexadecimal notation offers significant advantages in terms of both efficiency and range. By condensing complex RGB values into a concise six-digit format, hex color codes facilitate streamlined communication and implementation of color specifications in digital media. With 16,777,216 possible combinations (16^6), hex codes encompass a comprehensive palette of colors that can be accurately reproduced on various digital screens, ensuring fidelity to designers' creative intentions.
Hex Code Abbreviations
In addition to full six-digit hex codes, abbreviated versions can be used for common colors. This shorthand notation offers several benefits:
Compactness: Reduces the code length to three digits, enhancing readability and efficiency in coding.
Performance Optimization: Helps optimize web page performance by reducing file sizes in CSS and HTML documents.
Ease of Use: Simplifies color specification and editing, particularly in large-scale web projects.
Compatibility: Widely supported across browsers and digital platforms, ensuring consistent color rendering.
For example:
#F00: Represents pure red (#FF0000).
#0F0: Represents pure green (#00FF00).
Practical Applications in Web Design
Hex color codes serve as foundational tools in web design, providing designers with a precise means to specify and manipulate colors across different digital platforms. By incorporating hex codes directly into CSS stylesheets or HTML attributes, designers ensure uniformity and coherence in color schemes, regardless of the viewing device or browser. This approach facilitates seamless adjustments and updates to color palettes throughout the development lifecycle, enhancing both aesthetic appeal and user experience.
Learning and Skill Development
Understanding hex color codes extends beyond practical application in web design, encompassing broader implications for digital media production and software development. Mastery of hex codes equips designers and developers with enhanced control over color manipulation and presentation, fostering creativity and technical proficiency across various digital disciplines. By grasping the nuances of hexadecimal notation and its relationship to RGB color encoding, professionals can elevate their capabilities in graphic design, image editing, and interface development.
Conclusion
In conclusion, hex color codes represent a cornerstone of modern digital design, enabling precise color representation and consistency in an increasingly digital world. By leveraging hexadecimal notation and its applications in the RGB color model, designers empower themselves to articulate visual concepts effectively and create compelling digital experiences. Mastery of hex color codes not only enhances technical proficiency but also enriches creative expression, underscoring their significance as essential tools for contemporary digital professionals.
0 notes
Text
ESP32 Espruino: convert number to string in different bases
The objective of this esp32 tutorial is to explain how to convert a number to string in different bases, using the Espruino on the ESP32. The tests were performed using a DFRobot’s ESP32 module device integrated in a ESP32 development board.
Introduction
The objective of this post is to explain how to convert a number to string in different bases, using the Espruino on the ESP32.
To perform the mentioned conversion, we simply need to call the JavaScript
toString method on the number we want to convert, passing as input the base we want to use [1]. The base is represented as a number, with its value corresponding to the desired base.
If we don’t pass any input to the toString function, the decimal representation (base 10) will be used [1].
Although the most used bases alternative to decimal are binary, octal and hexadecimal, we can use other ones.
The tests shown in this ESP32 JavaScript tutorial were performed using a DFRobot’s ESP32 module device integrated in a ESP32 development board.
The code
The code for this tutorial will be very simple. In this case, instead of writing a full script and upload it to the ESP32 like we have been doing in previous tutorials, we will send the commands directly on the command line interface of the Espruino IDE.
We will start by declaring a number variable and then print it in different bases and compare the results against this online base converter. I will use the number 34, but you can use other numbers to test.
var num = 34;
We will first call the toString method without any arguments, so the conversion is performed to decimal representation.
console.log(num.toString());
Next we will convert it to binary, which is the same as base 2. From the online converter, the expected result is 100010.
console.log(num.toString(2));
You can check below at figure 1 the result of the command, which matches the previously mentioned value obtained from the online tool.

Figure 1– Conversion of number to string in binary.Now we will use a base 8 representation. The result should be 42, as obtained from the online converter tool.
console.log(num.toString(8));
At figure 2 you can see the result from the previous command, which matches the expected result.

Figure 2– Conversion of number to string in octal.We will test it for hexadecimal representation, which corresponds to base 16. The expected result is 22.
console.log(num.toString(16));
As can be seen in figure 3, the result matches again the expected value.

Figure 3– Conversion of number to string in hexadecimal.
To finish, we will use base 20, which is not a base commonly used. The expected value for this base is 1e.
console.log(num.toString(20));
As can be seen in figure 4, the value printed to the console is the one expected.
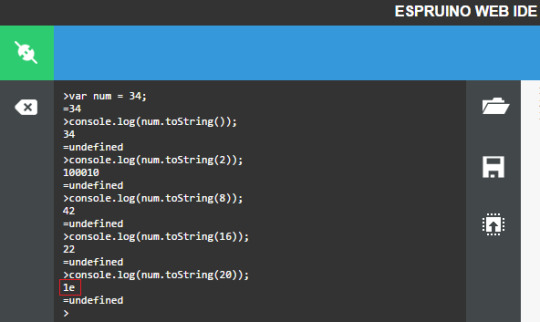
Figure 4– Conversion of number to string in base 20.
DFRobot supply lots of esp32 arduino tutorials and esp32 projects for makers to learn.
0 notes
Photo

Kotlin From Scratch: Variables, Basic Types, and Arrays
Kotlin is a modern programming language that compiles to Java bytecode. It is free and open source, and promises to make coding for Android even more fun.
Kotlin is 100% interoperable with Java. In other words, it can be used together with Java in the same project. So you can refactor parts of your Java code to Kotlin and it won't break. In addition to that, it is concise, expressive, and has great tooling. Kotlin can be used on the back-end (server-side), but it's getting a lot of attention right now as a language for Android app development. Kotlin is now supported by Google as a first-class language for Android development, so the popularity of Kotlin is set to explode!
In this first tutorial in the Kotlin From Scratch series, you'll learn about the language basics: comments, variables, simple types, arrays, and type inference.
Prerequisites
To follow along with me, you will need the Kotlin plugin on Android Studio. Alternatively, you could use the online playground or IntelliJ IDEA Community Edition.
1. Variables
In Kotlin, use val to declare a constant or var keywords to declare a variable. You can specify a type such as String or Int after the variable name. In the example below, we declared a constant firstName of type String with the val keyword.
val firstName: String = "Chike"
But you'll soon realize that in Kotlin, it's often possible to omit the type from the declaration and the compiler won't complain.
val lastName = "Mgbemena" // will still compile
In the code above, you'll observe that we did not explicitly state the type String. The code above will still work because the compiler has implicitly inferred the type using type inference. We'll come back to this!
The difference between the val and var keywords is that the former is immutable or read-only (its value cannot be changed), while the latter is mutable (its value can be changed).
val dateOfBirth = "29th March, 1709" dateOfBirth = "25th December, 1600" // cannot be changed var car = "Toyota Matrix" car = "Mercedes-Maybach" // can be changed
Note that for a variable declared with the var keyword which has its type inferred by the compiler, assigning another value of a different type won't work. In other words, the value of the variable can change, but its type cannot! For example:
var age = 12 age = "12 years old" // Error: type mismatch
It is highly recommended that you start by making your variables immutable by declaring them with the val keyword, so as not to maintain too many states. This makes your code safer for multithreading, because it ensures your variables cannot be modified by other threads unexpectedly.
Another thing you should know about the val keyword is that you can declare it with a type only and assign it a value later. But you can still only assign a value once.
val carName: String carName = "Toyota Matrix" // will compile
In Java, it's possible to declare multiple variables of the same type on a single line, but this doesn't work in Kotlin. In Kotlin, all variable declarations must be on their own lines.
val carName = "BMW", streetName = "Oke street" // this won't compile // this will compile var carName = "BMW" var streetName = "Oke street"
2. Type Inference or Deduction
Kotlin is a strongly typed language that supports type inference or deduction. This is the mechanism employed by the compiler to find out types from context. Java doesn't have a type inference mechanism, which means you must explicitly declare the type of every function or variable. Type inference helps reduce the boilerplate code you have to write.
val country = "Nigeria" // type is inferred by compiler val code = 234
The code above would compile even though we did not explicitly state the type for the variable country. The compiler is smart enough to know that the country is of type String, because the value, "Nigeria", is a string.
3. Basic Types
In Java, we have two types of type—primitive (e.g. int, long, boolean, byte, char, etc.) and reference types (e.g. array, String). Java uses wrappers (like java.lang.Integer) to make primitive types behave like objects. But in Kotlin, there is no such distinction. Instead, all types are objects.
Numbers
The integer types available in Kotlin are:
Long—64 bit
Int—32 bit
Short—16 bit
Byte—8 bit
The floating-point types are:
Double—64 bit
Float—32 bit
val myInt = 55 val myLong = 40L val myFloat = 34.43F val myDouble = 45.78 val myHexadecimal = 0x0F val myBinary = 0b010101
You can observe that we created a Long literal by adding the suffix L, and for Float we added the suffix F or f. Numbers can also be written in hexadecimal notation using the 0x or 0X prefix and in binary using the 0b or 0B prefix. Note that in all these cases, Kotlin can use type inference to know the type we want instead.
val myLong = 19L val myLongAgain: Long = 40
To convert a number from one type to another, you have to explicitly invoke the corresponding conversion function. In other words, there is no implicit conversion between types of numbers.
val myNumber = 400 val myNumberAgain: Long = myNumber // throws Error: Type mismatch
Each number type has helper functions that convert from one number type to another: toByte(), toInt(), toLong(), toFloat(), toDouble(), toChar(), toShort().
val myInt = 987 val myLong = myInt.toLong()
In the code above, we are converting from an integer to a long. We can also do the reverse by using the method toInt() on the long variable. Note that this will truncate the value to fit the smaller size of an Int type if need be—so be careful when converting from larger types to smaller ones!
You can also convert a String into a number type.
val stringNumber = "101" val intValue = stringNumber.toInt()
In the code above, we converted the variable stringNumber into an Int type by calling the method toInt() on the variable. We can write this more succinctly by instead calling the method directly on the string:
val intValue = "101".toInt()
The Boolean Type
The Boolean type in Kotlin is the same as in Java. Its value can be either true or false. The operations disjunction (||), conjunction (&&), and negation (!) can be performed on boolean types, just like Java.
val myTrueBoolean = true val myFalseBoolean = false val x = 1 val y = 3 val w = 4 val z = 6 val n = x < z && z > w // n is true
Strings
Strings can be created with either double quotes or triple quotes. In addition to that, escape characters can be used with double quotes.
val myString = "This is a String" val escapeString = "This is a string with new line \n"
To create a string that spans multiple lines in the source file, we use triple quotes:
val multipleStringLines = """ This is first line This is second line This is third line """
Kotlin also supports string interpolation or string templates. This is an easier way to build dynamic strings than concatenation, which is what we use in Java. Using string templates, we can insert variables and expressions into a string.
val accountBalance = 200 val bankMessage = "Your account balance is $accountBalance" // Your account balance is 200
In the code above, we created a string literal, and inside it, we referred to a variable by the use of a $ character in front of the variable name. Note that if the variable is not correct or doesn't exist, the code won't compile.
What about if you need to use $ in your string? You just escape it with \$! Also, you can call methods from an interpolated String directly; you have to add curly braces ${} to wrap it.
val name = "Chike" val message = "The first letter in my name is ${name.first()}" // The first letter in my name is C
Another cool thing you can do is to perform some logic inside the curly braces when creating a String literal.
val age = 40 val anotherMessage = "You are ${if (age > 60) "old" else "young"}" // You are young
Arrays
In Kotlin, there are two main ways to create an array: using the helper function arrayOf() or the constructor Array().
The arrayOf() Function
For example, let's create an array with some elements using arrayOf().
val myArray = arrayOf(4, 5, 7, 3)
Now, to access any of the element, we can use its index: myArray[2]. Note that we can pass in values of different types into the arrayOf() as arguments and it will still work—it will be an array of mixed type.
val myArray = arrayOf(4, 5, 7, 3, "Chike", false)
To enforce that all the array values have the same type, e.g. Int, we declare a type by calling arrayOf<Int>() or intArrayOf().
val myArray3 = arrayOf<Int>(4, 5, 7, 3, "Chike", false) // will not compile val myArray4 = intArrayOf(4, 5, 7, 3, "Chike", false) // will not compile
We also have other utility functions to create arrays of other types such as charArrayOf(), booleanArrayOf(), longArrayOf(), shortArrayOf(), byteArrayOf(), and so on. Behind the scenes, using these functions will create an array of their respective Java primitive types. In other words, intArrayOf() will compile to the regular Java primitive type int[], byteArrayOf() will be byte[], longArrayOf() will be long[], and so on.
The Array() Constructor
Now let's see how to create an array with Array(). The constructor of this class requires a size and a lambda function. We'll learn more about lambda functions later in this series, but for now, just understand that it is a simple, inline way of declaring an anonymous function. In this case, the job of the lambda function is to initialize the array with elements.
val numbersArray = Array(5, { i -> i * 2 })
In the code above, we passed 5 as the size of the array in the first argument. The second argument takes in a lambda function, which takes the index of the array element and then returns the value to be inserted at that index in the array. So in the example above, we created an array with elements 0, 2, 4, 6, and 8.
4. Comments
This is an easy one. In Kotlin, comments are just the same as in Java. We can use either block or line comments:
/* hello, this is a block comment with multiple lines. This is another line. This is another one again */ // this is a single line comment
Conclusion
In this tutorial, you learned the basics of the Kotlin programming language: variables, basic types, type inference, arrays, and comments. In the next tutorial in the Kotlin From Scratch series, you'll learn about loops, ranges, conditions, collections, and packages in Kotlin. See you soon!
To learn more about the Kotlin language, I recommend visiting the Kotlin documentation. Or check out some of our other Kotlin tutorials here on Envato Tuts+.
Android SDK
Quick Tip: Write Cleaner Code With Kotlin SAM Conversions
Ashraff Hathibelagal
Android Studio
Coding Functional Android Apps in Kotlin: Getting Started
Jessica Thornsby
Android SDK
Java vs. Kotlin: Should You Be Using Kotlin for Android Development?
Jessica Thornsby
by Chike Mgbemena via Envato Tuts+ Code http://ift.tt/2wP7P0v
0 notes